
Background
Android Studio is Google’s IDE (Integrated Development Environment) for creating Android applications.
JavaCC is an open source compiler-compiler that reads a specification for a custom computer language and generates Java code that parses instances of that language and either generates output code (a compiler) or executes what its input specifies (an interpreter). I’m using JavaCC in a calculator Android app, to interpret expressions the user types into the app.
If you’re not familiar with compiler-compilers (compiler-generators) I recommend a Yacc/Lex tutorial such as Tom Neimann’s introduction to Yacc and Lex. That tutorial will give you the background necessary to make sense of any modern compiler-compiler, including JavaCC. You can also find JavaCC tutorials here and there on the web.
Why use a compiler-compiler in an Android program? I needed one for a calculator program I wrote: the output of my JavaCC language correctly interprets C++ expressions that the phone user types. You’ll need a compiler-compiler whenever you find your Android program needs to parse a formal language that isn’t JSON, CSV, or XML, such as Legacy data from older devices and systems. It’s also useful for those rare times when you need to create a concise, domain-specific language and JSON or XML is just too verbose.
Add the Gradle Plugin for JavaCC
Before we get too far: you don’t need to download and install JavaCC from JavaCC.org; the Gradle plugin for JavaCC contains everything you need. You’re going to modify your Android Studio Gradle files to download and use the Gradle plugin for JavaCC.
First, create your Android Studio project, specifying a folder name and a root package name. For this example, suppose that your project folder is MyApp and the root package is org.bluepapertech.myapp.
In Android Studio, in the Project pane, expand the Gradle Scripts entry. Notice that your new project tree has two build.gradle files: One, (Project: MyApp), which is the file MyApp/build.gradle and the other, (Module: app), which is the file MyApp/app/build.gradle. The first file contains the project-wide Gradle configuration; the second file contains your app-build-specific Gradle commands.
Double-click on build.gradle (Project: MyApp). Modify the buildscript section of that file to include the Maven Central repository and the Gradle plugin dependency. Your modified buildscript section will look something like this:
buildscript {
    repositories {
        jcenter()
        mavenCentral()
    }
    dependencies {
        classpath 'com.android.tools.build:gradle:2.2.3'
        classpath group: 'ca.coglinc', name: 'javacc-gradle-plugin', version: '2.4.0'
        // NOTE: Do not place your application dependencies here; they belong
        // in the individual module build.gradle files
    }
}
In that same build.gradle file, add a javacc plugin line after the existing apply plugin line. The top of your build.gradle file should now look something like this:
apply plugin: 'com.android.application'
apply plugin: 'ca.coglinc.javacc'

android {...
When you start making these changes, Android Studio will show a sync error and offer a link to sync the app. Once you’ve finished these changes, click that link. Gradle will run and if all goes well, will quickly complete without errors.
A Maven Central Tip: getting the latest plugin version
Although I’ve used version 2.4.0 in the above example, the plugin will eventually be updated, and you probably want to use that updated version instead of 2.4.0.. To find the latest version of a Maven plugin:
- Browse to the Maven Central Search Page.
- Enter the name of a plugin, for example: javacc-gradle-plugin.
- Click the Search button.
- In the results, look for the Latest Version number.
- Copy that number to your build.gradle file, replacing ‘2.4.0’ in the example above.
Add your javaCC input and output paths
Create the javaCC directory in your source tree: mkdir MyApp/src/main/javacc. The directory MyApp/src/main should now look something like this:
$ ls
AndroidManifest.xml  java/  javacc/  res/
Next, open the app/build.gradle file again, and add to the android section the following sourceSets section. I prefer to add this section after the android buildTypes section in the file.
    sourceSets {
        main {
            java.srcDir compileJavacc.outputDirectory
        }
        applicationVariants.all {
            variant -> variant.javaCompile.dependsOn compileJavacc
        }
    }
Next choose the java package name for your generated parser files. Remember that we chose a application package name of org.bluepapertech.myapp. Let’s make our parser package a sub-package of that: org.bluepapertech.myapp.parser. This arrangement makes it easier for Android Studio to find the parser files.
Now that we know the parser package name, we can tell JavaCC where to put its generated parser .java files. Remember that the normal path to the source of java files in a package is a folder per ‘.’ component. That is, our parser Java files in the package org.bluepapertech.myapp.parser will be stored in a subdirectory named org/bluepapertech/myapp/parser. Add a compileJavaCC task to the bottom of the app/build.gradle file, that defines that output subdirectory:
compileJavacc {
    inputDirectory = file('src/main/javacc')
    outputDirectory = file(project.buildDir.absolutePath + '/generated/javacc/com/bluepapertech/myapp/parser')
}
Create a simple .jj grammar file
Before you build your real grammar, it’s a good idea to test the configuration of the project with a simple grammar. We’ll create a grammar file named parentheses.jj in the app/src/main/javacc folder.
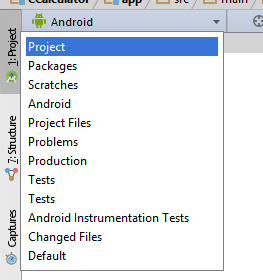
Switch the Android Studio view (in the upper-left of the screen) from Android to Project.
Expand the project tree so that you can see the app/src/main/javacc directory.
Right-click the javacc directory and select New / File, give the file the name parentheses.jj and (if prompted) choose a file type of Text because Android Studio doesn’t know about .jj files. By the way, there is an Android Studio plugin to let it understand .jj files, but I haven’t integrated that yet.
Add the following text to your parentheses.jj file. This text defines a simple parenthesis-matching grammar that accepts any string containing nothing but matched, nested pairs of parentheses. Pay special attention to the line after PARSER_BEGIN that declares the java package of the parser. This package name must match the JavaCC outputDirectory declared in your app’s build.gradle file.
options {
  BUILD_PARSER = true;
  BUILD_TOKEN_MANAGER = true;
  USER_TOKEN_MANAGER = false;
  USER_CHAR_STREAM = false;
  STATIC = true;

  LOOKAHEAD = 1;
  FORCE_LA_CHECK = false;
  DEBUG_LOOKAHEAD = false;

  CHOICE_AMBIGUITY_CHECK = 2;
  OTHER_AMBIGUITY_CHECK = 1;

  SANITY_CHECK = true;
  DEBUG_PARSER = false;
  DEBUG_TOKEN_MANAGER = false;
  ERROR_REPORTING = true;

  JAVA_UNICODE_ESCAPE = false;
  UNICODE_INPUT = false;
  IGNORE_CASE = false;
}

PARSER_BEGIN(ParenthesesParser)
package com.bluepapertech.myapp.parser;

public class ParenthesesParser {

}

PARSER_END(ParenthesesParser)

/**
 * Root Production
 */
void Input():
{
}
{
  Parentheses() <EOF>
}

/**
 * Matching parentheses production.
 */
void Parentheses():
{
}
{
  "(" [ Parentheses() ] ")"
}
Check that the parser files are generated properly
In Android Studio, select Build / Make Project. After a little while the build should succeed. If it doesn’t, go back and check the steps above.
Once the build completes successfully, look at the JavaCC output directory, MyApp/app/build/generated/javacc/com/bluepapertech/ccalculator/parser. That directory should contain your generated parser files.
$ ls
ParenthesesParser.java              ParseException.java    TokenMgrError.java
ParenthesesParserConstants.java     SimpleCharStream.java
ParenthesesParserTokenManager.java  Token.java
Check that your Android Activity can access the generated parser classes
As a test, you’re going to make a small change to your MainActivity.java file to see that it can access the parser. Temporarily modify your MainActivity.onCreate() to declare a variable of your parser class – you won’t use this variable; it’s just a test of the build.
    @Override
    protected void onCreate(Bundle savedInstanceState) {
        super.onCreate(savedInstanceState);
        ParenthesesParser parser;
The class ParenthesesParser will be unknown. You should now be able to use Android Studio’s intelligent correction (click in ParenthesesParser and press Alt+Enter) to import the correct parser file. If that works, you can remove the ParenthesesParser line that we added.
Build your real parser
Now you’re ready to replace parentheses.jj with a JavaCC file of your own. Learning how to do that is a topic of its own. There are several JavaCC tutorials available on the web.
References
I’m deeply indebted to the generous people who documented their discoveries toward integrating JavaCC into Gradle builds and Android Studio:
- Lennart Rolland’s StackOverflow question pointed to the JavaCC plugin for Gradle. Y2i’s answer to the question described one way to integrate the plugin.
- John Martel’s JavaCC Plugin for Gradle worked perfectly for me.
- The HOWTO and stuff… blog about JavaCC and Android Studio describes most of the details. It also points to the IntelliJ (Android Studio) plugin that adds .jj file understanding to Android Studio (I haven’t used this plugin yet).
- Nate Glenn’s StackOverflow question and John Martel’s answer fit the last of the pieces together for me.
- And of course, the JavaCC team, for building the rich and useful open source Java compiler-compiler that made all this possible.