
I’m in the process of cleaning and repairing a family musical cuckoo clock. I’ve watched a lot of videos on repairing cuckoo clocks, and have disassembled, cleaned, and repaired one cuckoo movement, so I think I’m as prepared as I can be for working on the clock movement.
The musical movement is another matter. What follows is a detailed How To that captures what I learned, what to do, and what not to do.
Before we begin I should mention that musical clocks vary in their design: your clock’s music box may be attached to the clock movement differently than my clock; your clock’s music box may run and lock in a different way than my clock.
Checking out the clock
Before removing the guts of the clock, I took lots of photos, to guide me in reassembling everything, but also to document what was broken before I messed with the clock.
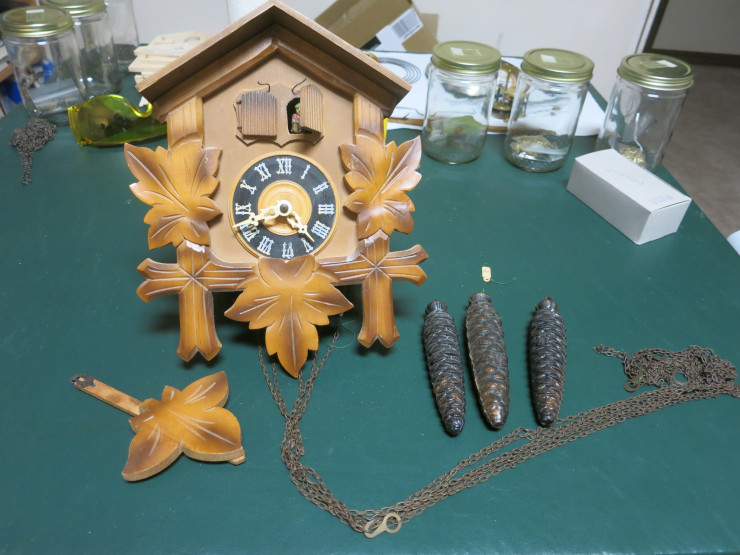
This clock has 3 weights and two doors, both of which are tip-offs that it’s a musical clock (or a quail clock, but those are rarer). The weights are marked (in grams) 320, 375, and 320. From work on other clocks, I assume the heavier weight is for the strike train – which has a lot of work to do – and the other two weights are for the time train and the music. A normal cuckoo bird is behind the left door, and the right door hides a seated man, who I assumed pops out when the music plays, on the hour.
I tried pulling gently on each of the chains in turn and was able to make the clock tick (a good sign), but the music would play only a couple notes before stopping. This is a clock that needs cleaning.
The back door of the clock has a sellers stamp on it: Heinrich Horn in Munich. It also has a sticker that reads “Donauwaltzer”; that is, the tune the clock plays is the Blue Danube Waltz.

How the music connects to the rest of the clock
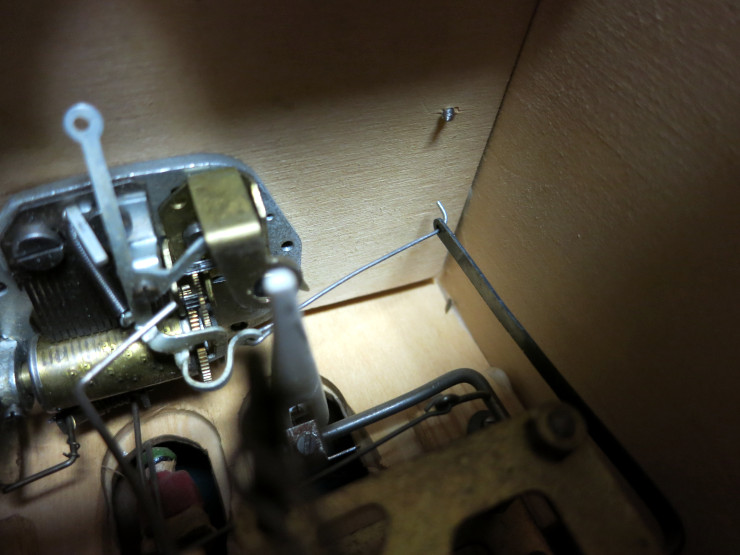
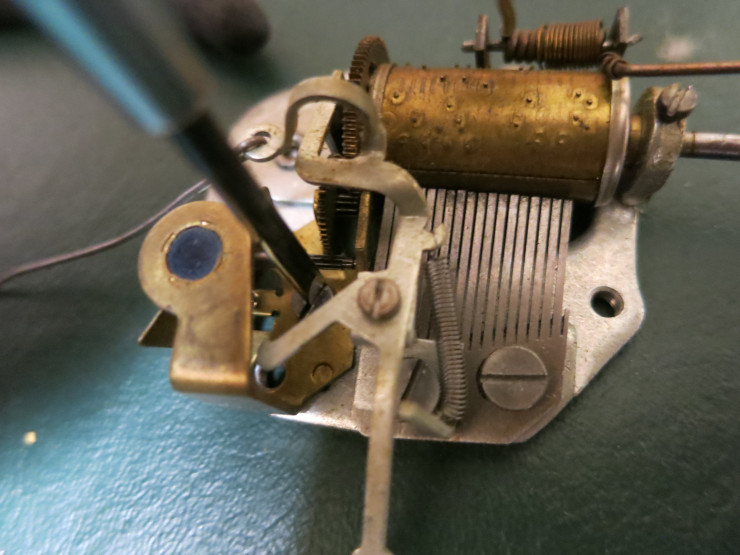
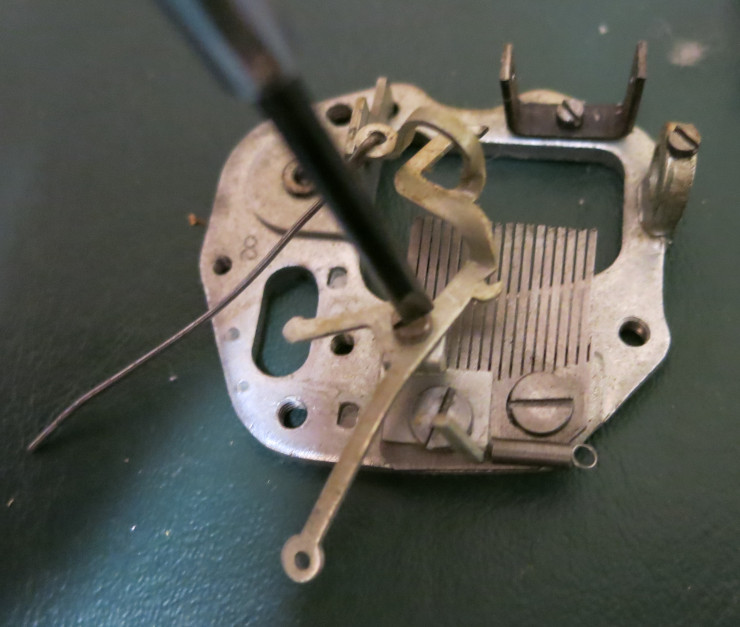
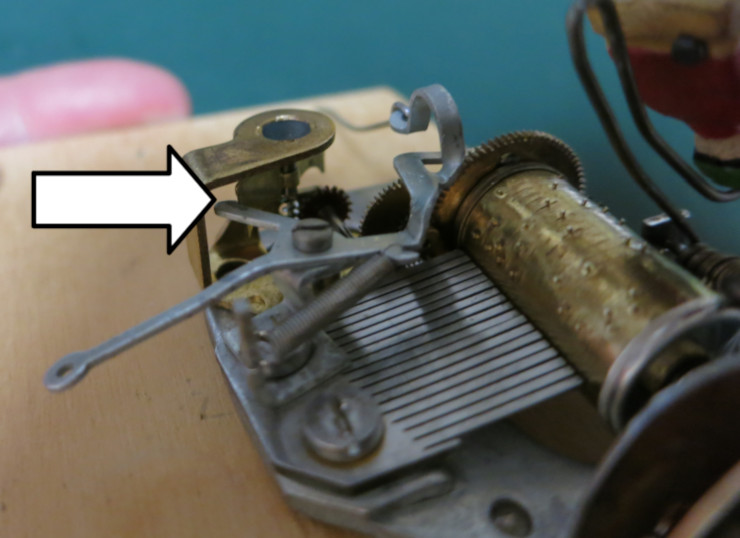
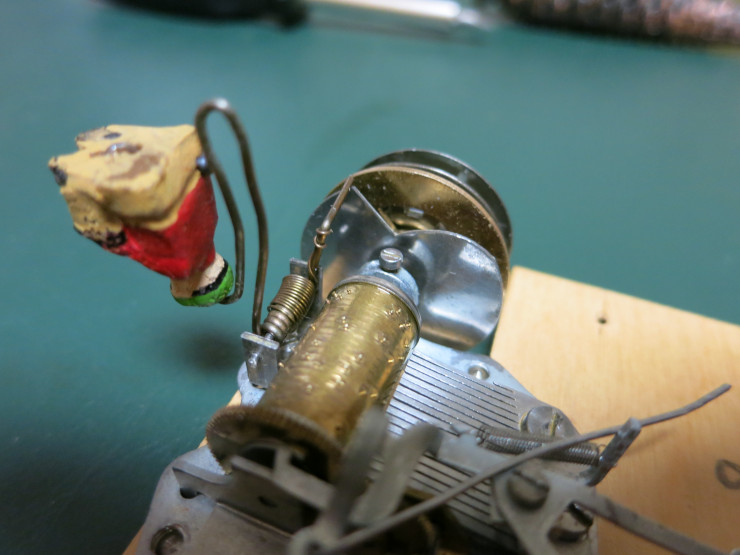
With 20-20 hindsight, I can now say the three ways that this musical movement is fastened to the rest of the clock, labeled in the photo below: 1) The music “locking lever”, which the clock movement pulls out of the lock position when the cuckoo bird pops out; 2) The music “warning lever” which moves to stop the fan (the governor) of the music when the bird pops out; 3) The little man, who kicks open his door when the music starts to play.
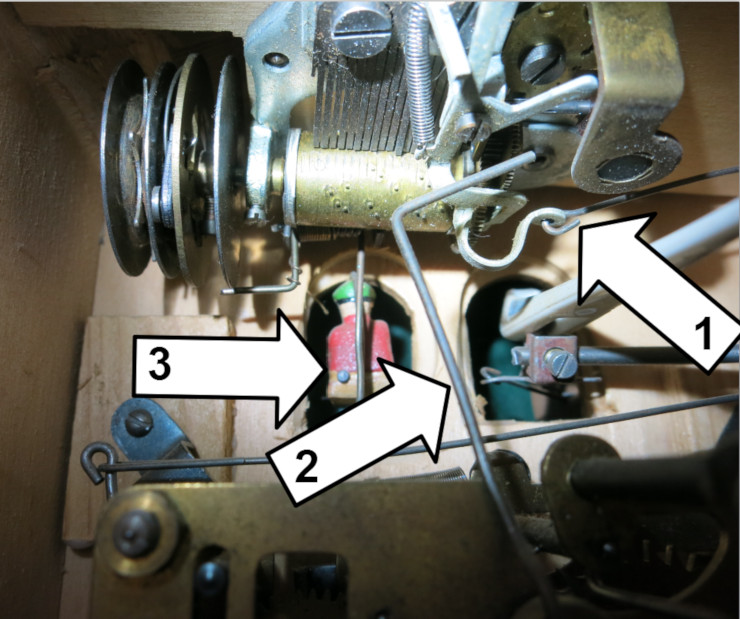
The idea is that when the bird starts to cuckoo, the musical movement starts to run, but immediately stops – before playing any notes or opening the man’s door – until the cuckoo is finished cuckoo-ing. When the cuckoo finishes cuckoo-ing and shuts its door, the music “warning lever” pulls away, letting the music play. Later in this post I’ll talk about the cam that lets the little man pop out and how the music stops playing.
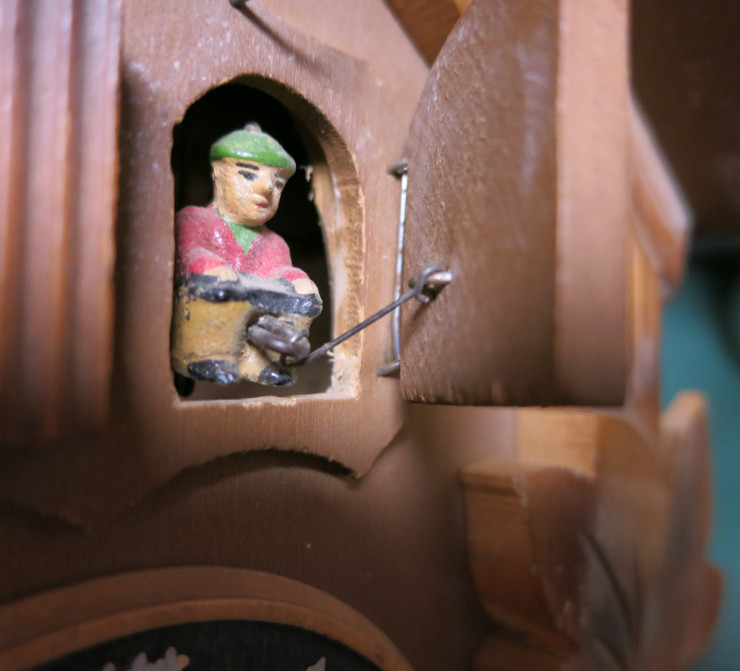
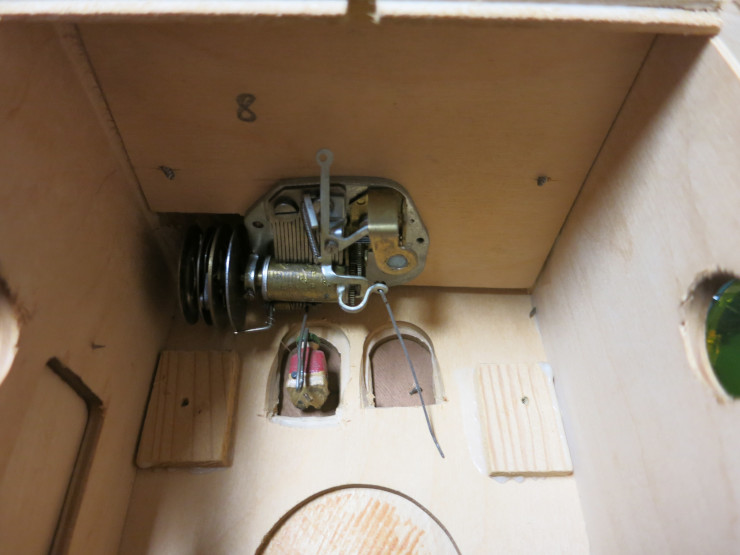
The little man has a wire connected to his door, just like the cuckoo bird has, so that when the little man pushes out, the door pops open.
Removing the musical movement
As with a non-musical cuckoo clock, I removed the hands, the chains, and the bellows, and unhooked the cuckoo bird from its door.
The only wire that connects the clock movement to the musical movement is the wire that pulls the musical “locking lever”, so I unhooked that wire from the clock movement. This unhooking took a little dexterity because of the cramped space.
Then I removed the clock movement – my what a lot of space that made!
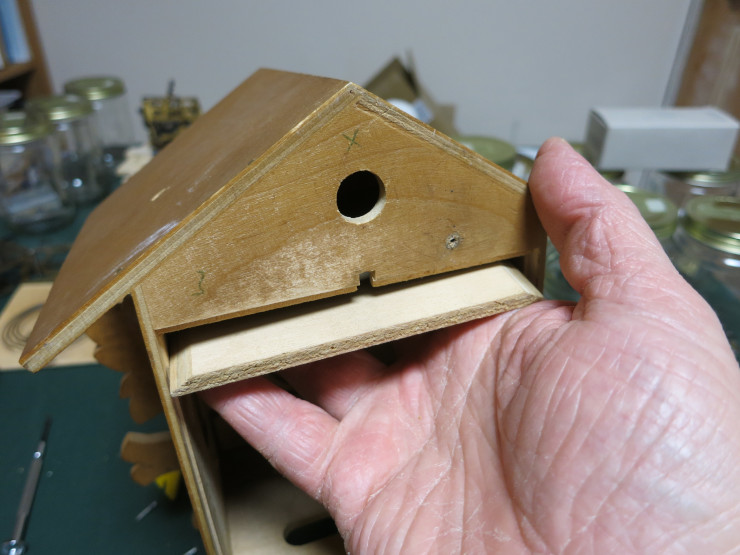
It turns out that this musical movement is screwed into the flat “ceiling” of the cuckoo clock case by two screws coming in from the top rather than the bottom. To remove the movement, I had to remove the ceiling.
In the above photo you can see the tips of the two wood screws that fasten the ceiling to the roof. I removed these two screws and the ceiling came loose.

…but that wasn’t the whole story. The ceiling wouldn’t come out! It turns out it was hung up on the back of the nail that holds the back door latch. I gently pried off the back door latch and its nail, and the ceiling dropped out just fine.

I then used a pair of snub nose pliers to unscrew the slot-less machine screws that held the movement to the ceiling – I have no idea why these screws have no slots – and the movement was ready to be disassembled.
Disassembling the musical movement
Before I go further, I should say that once the musical movement has a certain amount of wear, you can’t fix it. Barrel pins can become worn down with wear, or even pop off; comb tines (the bits that are plucked by the pins to play the tune) can become worn or break off. In that case it’s better – but expensive – to replace the musical movement with a new one. I’ve seen them run from about $70 to about $200.
“Why not buy a new barrel or comb on eBay?” I hear you ask. You can, but be aware that combs and barrels are matched: the comb that plays Edelweiss will likely not work with a barrel that plays Happy Wanderer. See my video of the tuning of this movement’s comb to see why the parts don’t interchange.
As in any clock repair project, I started disassembly by taking lots of photos of how the assembled musical movement fit together. Pro Tip: take photos from every angle, even if you don’t think there’s anything interesting in a photo. I would have saved myself a lot of reassembly trouble if I’d managed to catch a photo of exactly how the music locking lever fit into the end of the barrel, the position of the locking lever base, and whether the governor (fan assembly) had one or two screws (it has only one – maybe it was missing a screw to begin with).
Loosen the set screw that’s part of the great wheel (chain wheel) assembly and slide the assembly off of the barrel’s arbor.
Next I unscrewed the governor (the fan assembly). By the way, if you love your tune, but the governor is broken, you can buy a replacement governor at clock repair stores such as Timesavers.com
As in any clock project, keep track of which screw goes in which place. I do that by 1) keeping the musical movement parts in a separate jar from the rest of the clock parts, and 2) taking photos of the screw laid next to the part it goes into.
Next I went down a bit of a blind alley in trying to remove the little man: There is a screw at the base of the bracket that holds the little man. I tried – with much difficulty – to unscrew it only to find that doing that didn’t free the bracket. That screw is for something else, that I’ll explain in a bit.
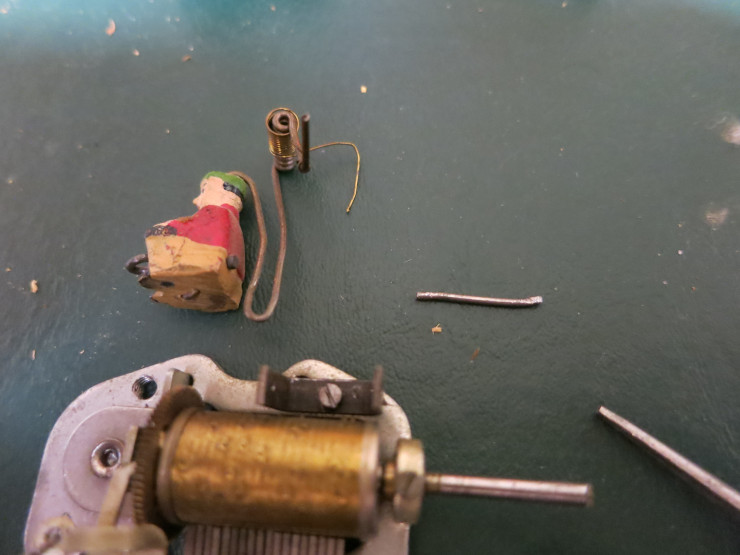
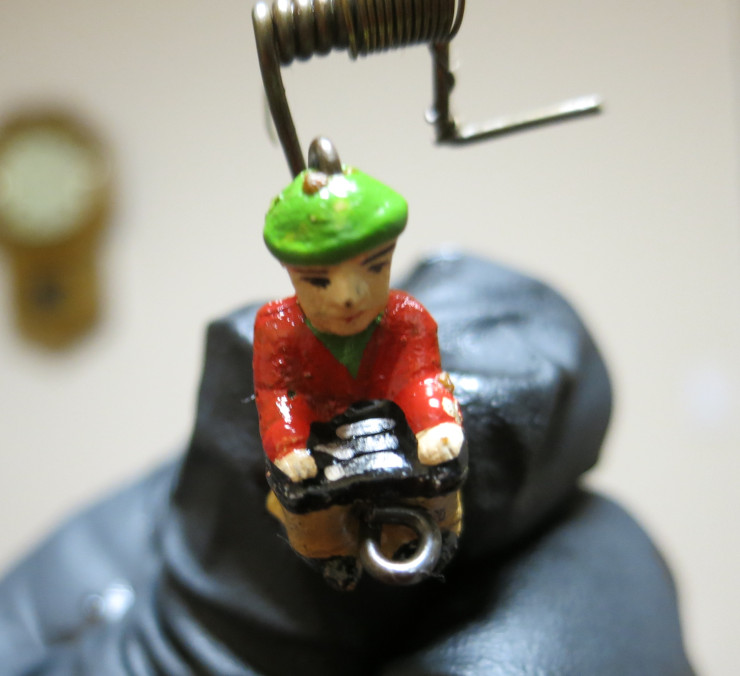
I removed the man by using a pair of pliers to pull the pin that the man’s spring is wound around.
Next I removed the barrel’s set screw, that holds the barrel’s bushing in place. NOTE: this bushing is really a sort of hollow cup, with the open part facing the barrel. I’m not sure why it’s designed this way; I suspect it’s to hold some sort of grease I know nothing about.
Now the barrel will fall out of its pivot hole, but it’s not free yet. Remember the screw at the base of the little man’s bracket? Now remove that screw. Then rotate the little man’s bracket out of the way so you can tilt the barrel completely free of its bracket.
Next it’s a simple matter to unscrew and free the music locking lever.
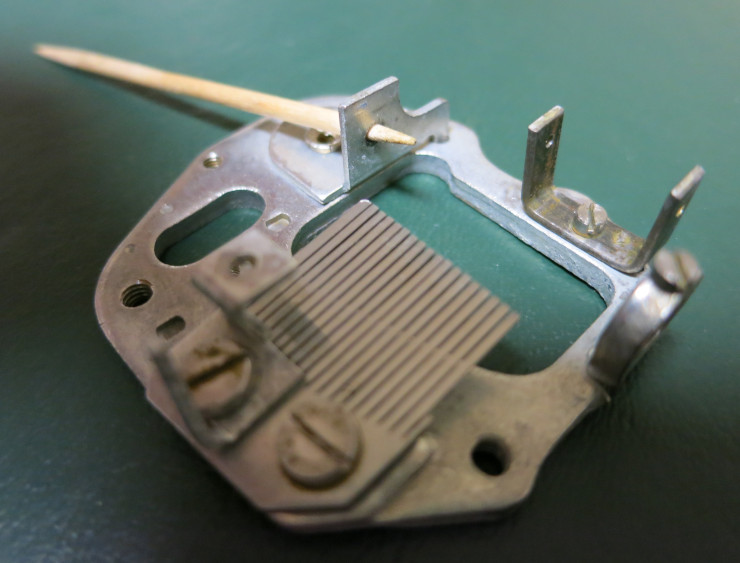
Next I should have unscrewed and removed the comb (via the two large screws in the photo above), but I was a bit intimidated by the prospect of micro-aligning the comb back with the barrel. More on that later. Unlike I did, steel yourself for some delicate work later, and unscrew the comb now.
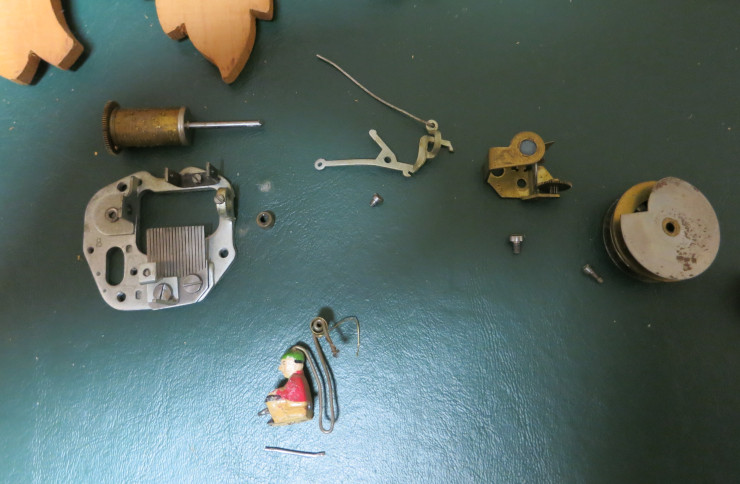
Before you forget where everything went, now is a good time to take a sort of Exploded View photo, showing what hardware fits into what parts.
Cleaning the musical movement
I cleaned all the parts except the little man the same way I clean clock movements:
- lightly scrub each part with a brass brush in a water bath with mild detergent. Note: don’t brush the comb or barrel with steel wool: the steel wool bits will snag between the tines of the comb or pins on the barrel, making a right mess of things. Also be very gentle with the comb – the tines bend very easily.
- thoroughly rinse the parts in water. NOTE: Plug the drain while rinsing, so you don’t lose any tiny screws down the drain.
- If you have an ultrasonic cleaner, clean those parts in it, then rinse them with water. NOTE: DON’T clean the barrel in an ultrasonic cleaner – see Update, below.
- wipe the parts with paper towels drenched in isopropol alcohol, to force out the water and avoid rust.
- pat the parts dry with more paper towels.
- Finally, ‘peg out’ all the holes using a toothpick. Pegging is a matter of twisting the toothpick (cocktail pick) in the hole to remove the last of the old oil and dirt – sometimes quite a lot – that the ultrasonic cleaner didn’t remove. For example, I noticed the barrel’s bushing had a lot of gunk in its cup.
UPDATE: I read a thread on the Nawcc.org message board that warned that alcohol – or, I assume, a hot ultrasonic clean – can melt the shellac that holds the pins on the barrel! So don’t clean the barrel in an ultrasonic cleaner, and keep the barrel’s contact with alcohol to a minimum – just what’s needed to dry the water out.
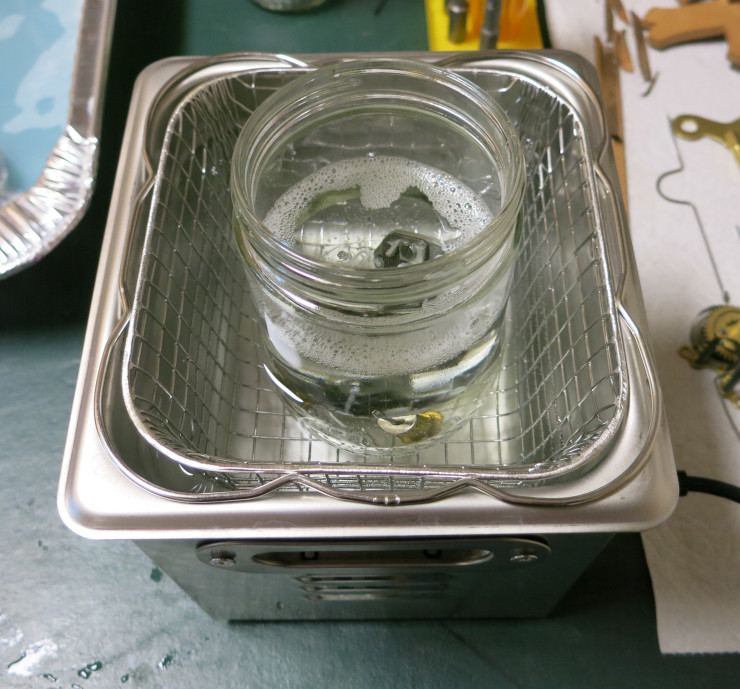
About ultrasonic cleaning: to clean a lot of little parts – like this disassembled movement – I put a glass jar with the cleaner in it inside the ultrasonic cleaner’s basket, and fill the basket with water. The ultrasonic waves transmit through the glass of the jar, and none of your tiny parts drop through to the floor of the cleaner. You put the jar in the basket rather than directly on the floor of the cleaner because the cleaner needs at least some water between its vibrator on the floor of the cleaner and the things being cleaned – otherwise it can break the ultrasonic cleaner.
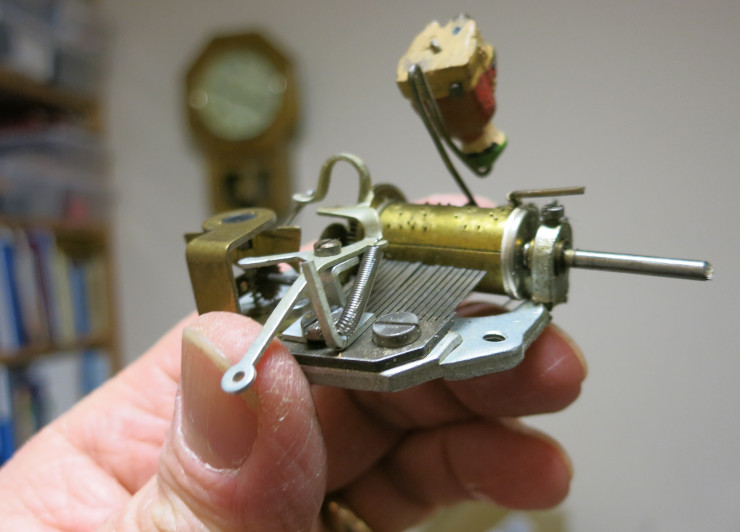
I cleaned the little man with a soft toothbrush and Gojo (without pumice) waterless hand cleaner, then wiped him dry with paper towels and Q-Tips. Once the little man was clean, I recognized that he’s a zither player, and a detailed one at that.
Reassembly
Well, you just put everything back in the reverse order, right? That’s more or less true, but there are a couple of fine points to be careful with.
Remember that the barrel’s bushing is a sort of open cup, and the open cup end faces the barrel. Also the bushing is adjustable – via the set screw above it – so that you can press it close to – but not right next to – the end of the barrel. The idea is to give the barrel a little freedom, but not as much as half of the width of a tine. Too little freedom and the barrel won’t turn; to much and the pins won’t pluck the tines right in their middle.
When first screwing down the comb, move the comb as far back away from the barrel as possible. You’ll adjust the position of the comb later. This avoids having pins of the barrel bend tines of the comb during reassembly.
When putting the locking lever in place, don’t worry about its exact position yet.
Adjusting the position of the comb
At this point, I thought I was home free – because I hadn’t unscrewed the comb or the mounting of the lock lever. Unfortunately, once I ran the movement using a weight and chain, I discovered that the low notes seemed out of sync with the high notes – as if the player’s left hand was a little slower than his right.
Here is a video demonstration of what this movement sounded like before and after fixing the problem.
After looking carefully at the movement, I saw the problem: the comb wasn’t parallel to the barrel. The high-pitched end was further away from the barrel than the low-pitched end. This tilt made the high-notes pluck sooner than the low notes. Looking at the photos I’d taken during disassembly, I saw that the comb was out of position before I started cleaning the movement – it had probably played badly for many years.
So I gritted my teeth and unscrewed the comb so I could adjust its position.
I found you need to align the comb with the barrel in all three of the following ways. It can take time, patience, and dexterity… and a magnifying glass. By the way, don’t worry about the position of the lock lever at this point. You’ll mess with that after adjusting the comb’s position.
- The comb must be parallel to the barrel. It must not be rotated one way or the other. If the comb is not parallel, the tune will play out of sync, like mine did.
- The comb must be just close enough to the barrel for the pins to pluck the comb’s tines. It must not be too far (where some worn pins miss their comb tines) or too near (where the pins could break or take so much pressure to pluck the comb that the movement stops running).
- The comb must be aligned left-right so that each column of pins on the barrel is lined up with the center of the corresponding comb tine.
Once you’re happy with the comb’s position, tighten the two large screws that hold the comb. These screws should be quite tight, to keep the comb from slipping out of place over time.
Adjusting the locking lever
I found it very hard to adjust the mounting of the locking lever correctly, mainly because I didn’t know how it was designed. I wound up bending the heck out of the lever to adjust it – DON’T DO THAT – instead of using the loose locking lever to position its mount. I’ll talk about that in a moment.
The locking lever is designed so that when the music finishes, the barrel-tip of the locking lever drops into a hole in the end of the barrel, causing the fan-tip of the locking lever to catch the end of the fan, stopping the movement. The next time the music should play, the clock movement pulls the locking lever, causing the barrel-tip of the lever to pull out of the hole, and the fan-tip of the lever to release the fan.
I found the easiest way to adjust the locking lever mount position correctly is:
- Loosen the left comb screw a little, to loosen the locking lever mounting. Don’t worry about the comb moving, because the other screw keeps the comb in place during this process.
- If you find it helps, remove the locking lever spring. Removing that spring will make it easier to make fine adjustments to the position of the locking lever mounting.
- Manually turn the great wheel to play the music, until the music stops.
- Move the barrel-tip of the locking lever – by moving the locking lever mounting – until that tip of the lever drops into the center of the hole in the end of the barrel. You may need to push the great wheel a little more to center the hole. NOTE: Never push the barrel backward; doing that can damage the pins and comb.
- With the barrel-tip of the locking lever in place, turn the fan blade with your fingers until one edge of the fan blade is pointing at the fan-tip of the locking lever.
- While holding the barrel-tip of the locking lever in place with one hand, adjust the position of the locking lever mounting (the part under the comb screw) until the fan-tip of the lever just catches the edge of the fan blade.
- Hold the mounting in position while you tighten the screw that holds it in place.
- Test the locking lever position by gently pulling the barrel-tip out of the hole in the end of the barrel, then manually turning the great wheel to play the music, then watching that when the barrel-tip of the locking lever falls into the hole, the fan-tip of the lever stops the fan. If it doesn’t, repeat this whole process to adjust the locking lever position.
- Once the locking lever works, reattach the locking lever spring.
Possible locking problems: If the locking lever is too far in one direction, it will slow or stop the fan while the music is playing. If it’s too far in another direction, the fan blade can catch against another part of the locking lever. If the fan blade doesn’t catch at the end of the music, the barrel will continue to turn, eventually catching the edge of the locking lever – that will stop the music, but the locking lever will then take a lot of pressure to pull out of the locked position. The lever and hole are designed so that in the locked position the lever is in the hole, but not caught on the edge of the hole.
There is one more subtlety about the locking lever design: when the clock movement pulls on then lets go of the locked locking lever, even just for a moment, the lever shouldn’t fall back into the hole. “How can this be?” I hear you ask.
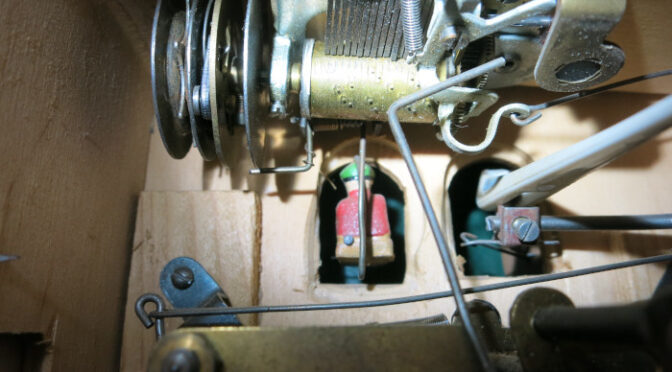
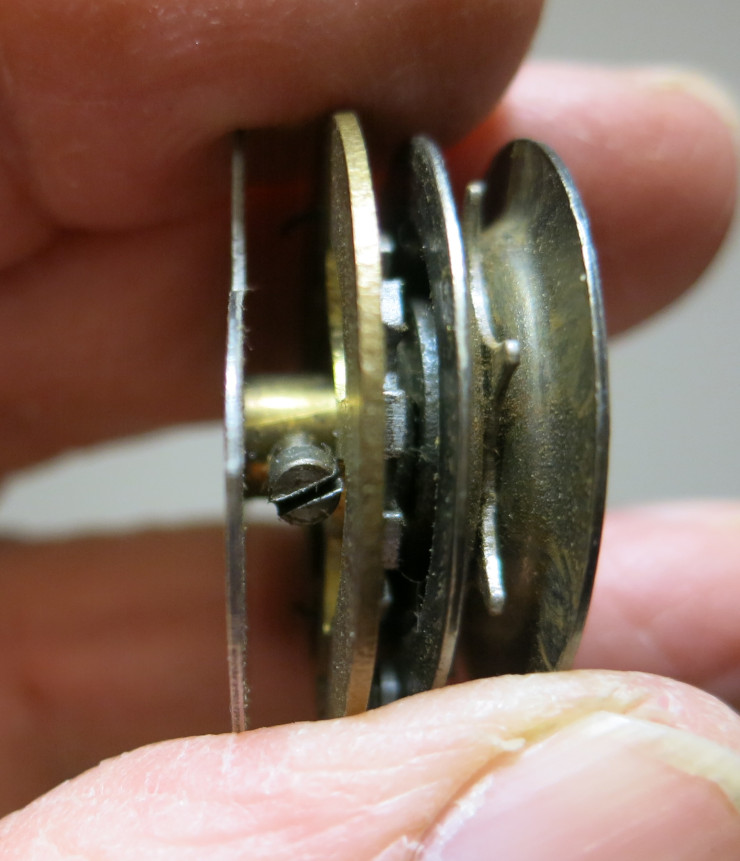
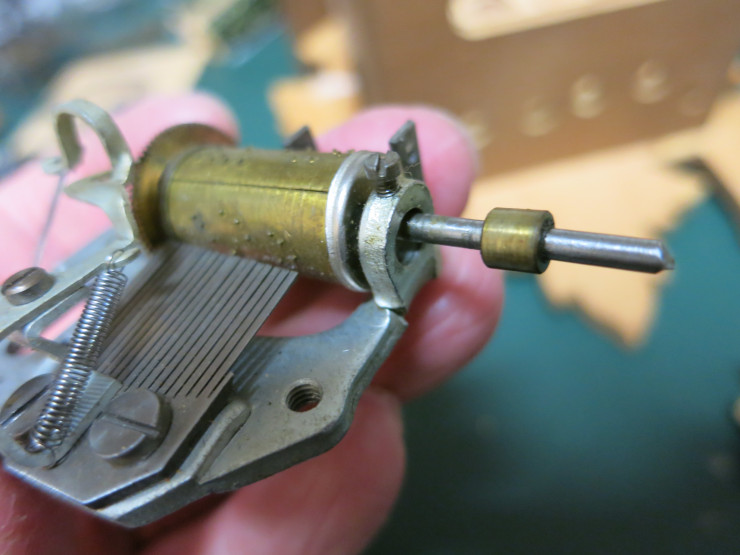
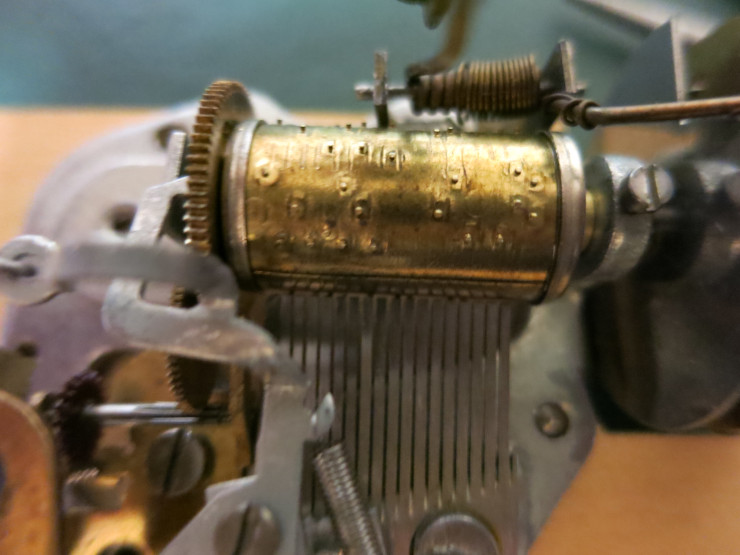
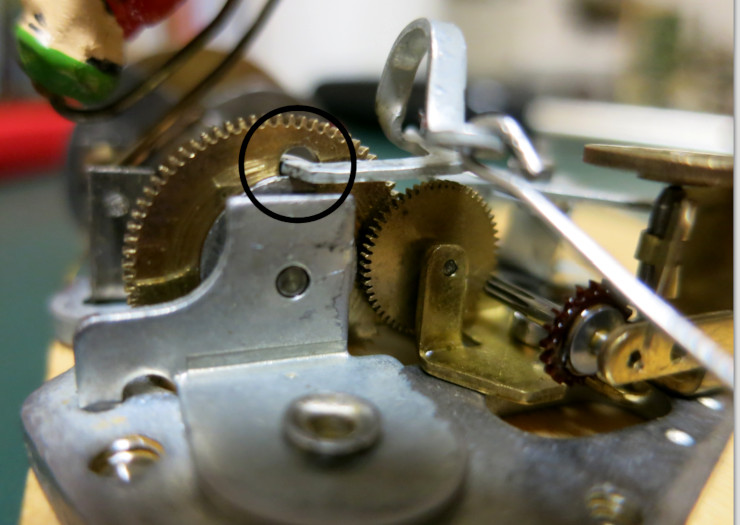
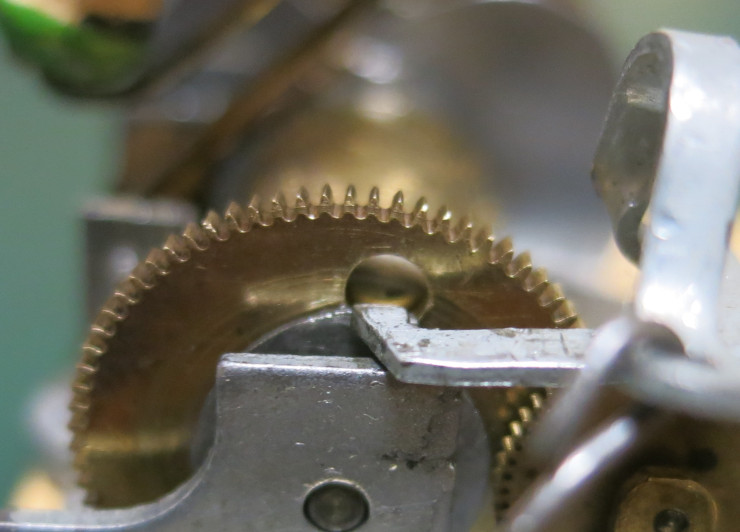
That little bit of magic is performed by a spiral cam that’s on the end of the barrel. In the figure below, you can see the cam, and the barrel-tip of the locking lever riding along its edge.
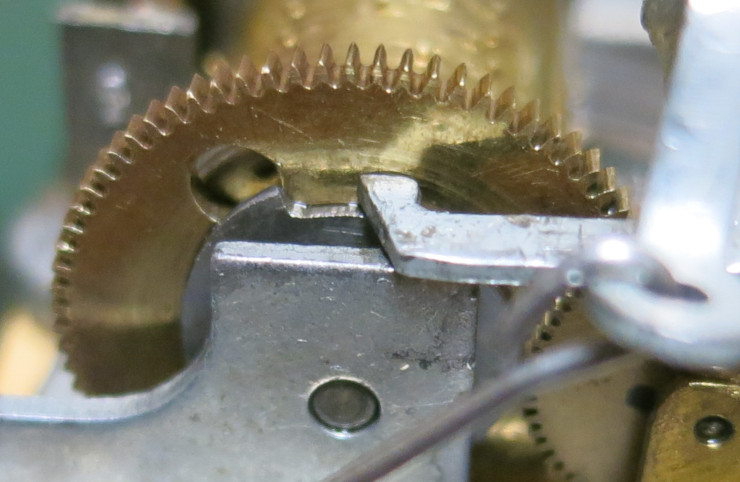
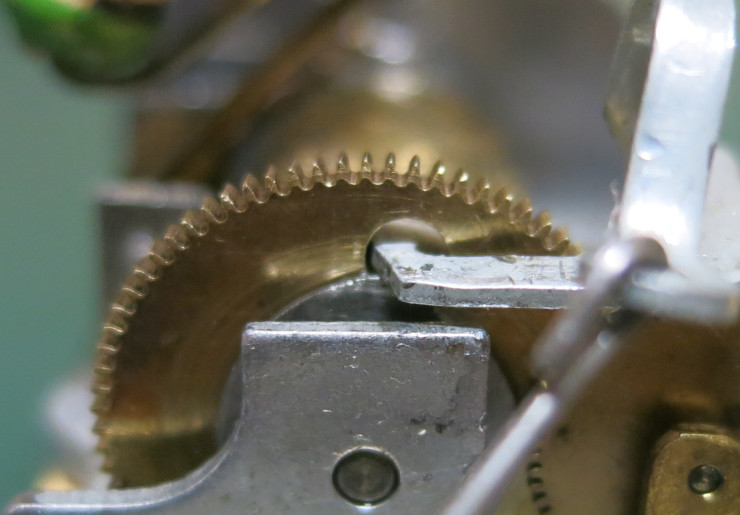
As the music plays and the barrel rotates (counter-clockwise in the above photo), the cam slowly lifts the barrel-tip of the locking lever up to the level of the hole in the end of the barrel. When the music ends, the locking lever tip falls into the hole and the musical movement locks. Later, when the locking lever is pulled by the clock movement, the lever tip drops down below the level of the barrel hole. So even a quick tug on the locked locking lever will unlock the musical movement, because the tip of the locking lever is no longer lined up with the hole. Look at the two pictures below to see the locked and unlocked lever tip.
What all this means is that there is another adjustment you may need to make. You may need to bend the barrel-tip of the locking lever up or down so that the tip just barely rides along the edge of the spiral cam. I had to make that adjustment because I had bent the heck out of the locking lever before I learned how to properly adjust its position by adjusting the mounting of the lever.

After I had gently bent the tip of the locking lever down a little, it rode the spiral cam perfectly, and the locking and unlocking of the musical movement worked great!
Adjusting the timing of the little man
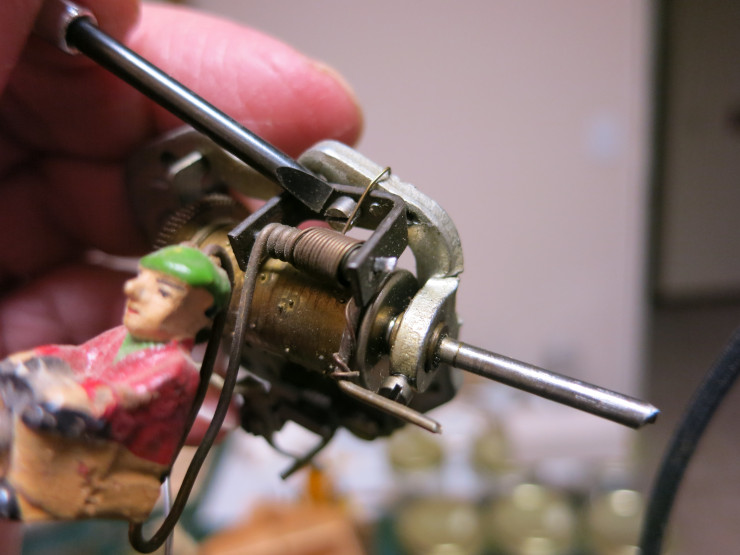
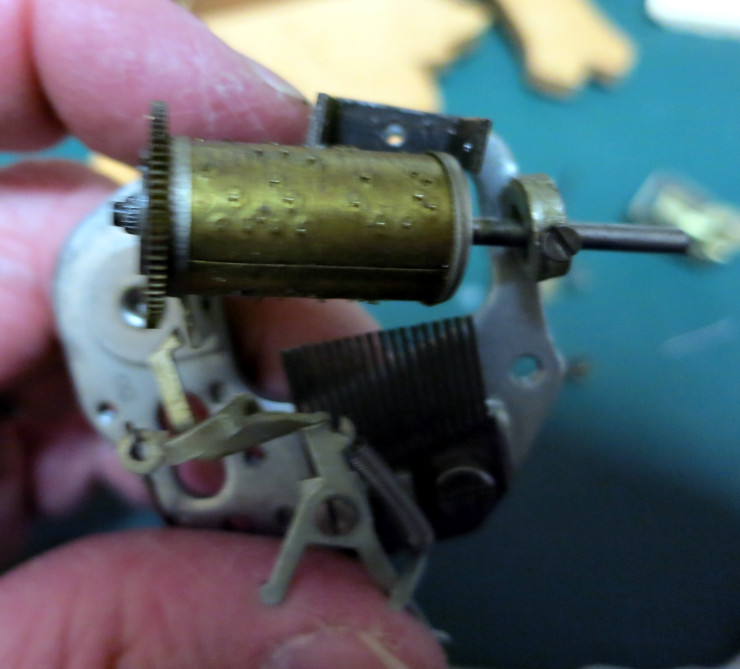
There is just one more adjustment to make, and it’s an easy one. A cam connected to the musical movement great wheel controls when the little man retreats into the clock and shuts his door.
As you can see in the photos below, the lever that holds the little man has a bent end that rides the large cam. As the music plays and the cam rotates (counter-clockwise in the photos below), the bent end of the lever falls over the edge of the cam, causing the little man to dash inside the clock.

You need to adjust the position of the large cam so that the lever drops and the man hides inside the clock just before the musical movement locks. If the large cam is turned too far one way, the man will be stuck outside the clock when the music locks; if the cam is turned too far the other direction, the man will hide before the music finishes.
Once you’re happy with when the man hides inside the clock relative to the end of the music, tighten the great wheel’s set screw. You’re finished adjusting the musical movement!
Oiling the movement
The last thing to do to the musical movement is to oil it with a tiny amount of good clock oil, sold by clock parts suppliers such as Timesavers.com.
I don’t know ‘officially’ what parts to oil on a musical movement, so I decided what to oil based on the parts you are supposed to oil on a clock: oil the pivot holes for the barrel and the three gears in the governor assembly (two little gears and the fan). Don’t oil the locking lever or its tips; don’t oil the tips of the comb; don’t oil the spring the little man is attached to. In other words, oil only pivot holes. If you oiled all those other parts that move against each other, it would just attract dirt.
Congratulations!
At this point, your musical movement should be working fine, and you deserve a pat on the back. Again, you can hear my cleaned, reassembled, and adjusted movement in the video that demonstrates before and after adjusting the comb.