
I bought my Lulzbot Mini 3D printer almost 2 years ago, and I’ve loved it. While I’ve read others’ troubles trying to get their kit 3D printers working, or calibrated, or repaired, or trying to get their prints to stick, or not stick… my little Lulzbot Mini has been chugging reliably along, printing accurate objects every time.
Now, inevitably, I have to admit my printer is showing its age, and that it’s time to get my hands dirty with a little maintenance.
As I was learning Autodesk Fusion 360, and recreating some of my older designs in that app (vs. my favorite, FreeCAD), I found my snap-fit box design wasn’t working. The lid was too small for the base. A year ago it had printed just fine.
At first I suspected some quirk of Fusion 360, but no, the generated STL files from FreeCAD and Fusion 360 had the same dimensions.
Then I suspected I hadn’t designed large enough clearances to allow for variation in printers, but after a day of reading 3d printing design guides, I was convinced that the 0.5 mm clearances I’d designed in were large enough.
Then I started to read up on printer calibration errors. It was the book 3D Printing Failures by Sean Aranda that made the clearest statement: it looks like my printer’s X and Y belts are loose. From what I’ve read, it sounds like loose belts are the most frequent cause of dimensional errors in FDM 3D prints.
So I started reading up on how to tighten my printer’s belts, and more importantly how much to tighten them. I learned that if you over-tighten the belts, you put stress on the stepper motor’s bearings, causing them to wear out and fail prematurely.
After a lot of research, I found Lulzbot’s documentation that the Mini’s X and Y belts should be tightened to 23-27 Newtons, and that the gizmo to measure the belt tightness costs a few hundred dollars. …or I can pluck the belt and see if it makes a satisfying ‘twang’ (can somebody post a recording of good and bad sounding Lulzbot Mini belts?) I see it’s something like tightening a bolt: most product manufacturers have specifications of exactly how much to tighten each bolt. You can either tighten them ‘about enough’ with an ordinary wrench, or you can buy an expensive torque wrench. Most of the time ‘about enough’ is fine.
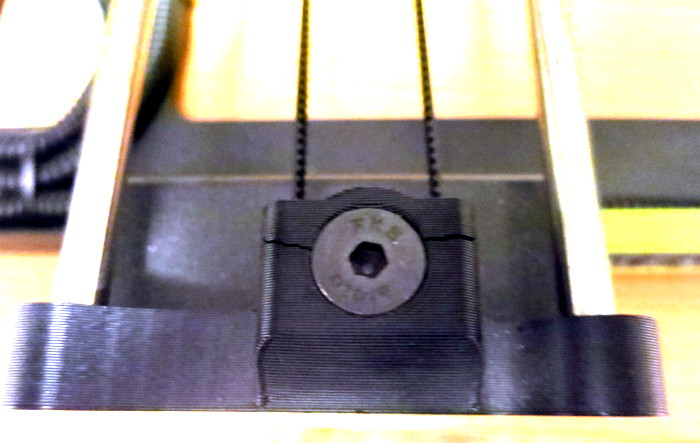
So I started to steel myself to undo my printer’s belts and re-tighten them when… oh, no… I saw that there are some stress cracks developing in both the X and Y idler supports. This is going to take some serious repair.

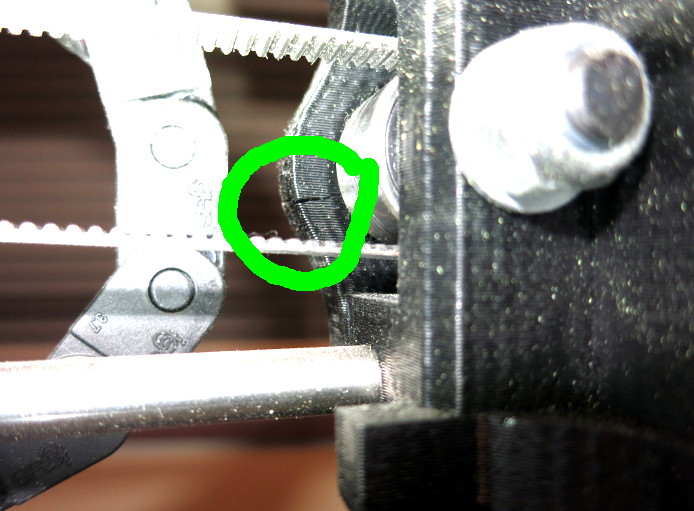
I assume that if I ignore the problem, one day the X or Y carriage will simply snap off and I’ll be printerless.
Repairing the Y axis doesn’t look so bad: I can buy a $10 replacement assembly from Lulzbot (or can print and assemble my own), then undo the Y belt and idler support, replace the support, and re-tighten the Y belt. Sweet.
Unfortunately, repairing the X-Axis assembly looks daunting. The X axis idler support is part of a larger assembly that looks like it has bearings and all manner of parts in it. I’ve sent a note to Lulzbot support to see what repair options I have. Luckily Lulzbot is an open-source printer, so I can print (or ask a friend to print) replacement parts.
I believe this is all part of the 3D printing experience: like owning a car in the early 1900’s, to keep it running you need to know how to tear the whole thing down and put it back together, and you need friends to lean on.
The folks at Lulzbot Support were speedy and informative. They pointed me to the models for the X and Y parts, assembly instructions, and even had suggestions of a couple quick patches I could do to get the printer going well enough to print replacement parts. They also explained the process for sending the printer to the factory for repair. Thanks for all those options, folks! That helped me choose what options to pursue.
Tuesday August 7: Received the shipping info from Lulzbot so I can send my printer to them to get a detailed quote of necessary and optional repairs. For the first time in 2 years I don’t have a 3D printer… I’m going through 3D printer withdrawal!
Monday August 13: My printer arrived at Lulzbot Repair on Friday. They assessed its state and today sent me an itemized list of repairs, sorted by urgency. I replied authorizing the repairs plus authorizing an upgrade to Lulzbot’s latest, modular, print bed. All this will cost me, as I expected, a few hundred bucks: about $200 for the repairs, and about $100 for the new print bed system.
Monday August 20: My repaired printer has returned! One slight hiccup: I found the updated firmware doesn’t work with my old Linux laptop’s too-old version of Cura, so I installed the latest Cura and drivers on my Windows laptop and checked out the printer – it works great! The new print bed looks sharp as well.
Rather than update my old Linux laptop I’d devoted to running the Mini, I decided this was a good time to install OctoPi/Octoprint on a Raspberry Pi 3 I had kicking around. Wow! Had I known how easy it was to install and run OctoPrint I would have done it a year or two ago. I can now monitor prints over the network, from anywhere in our house.
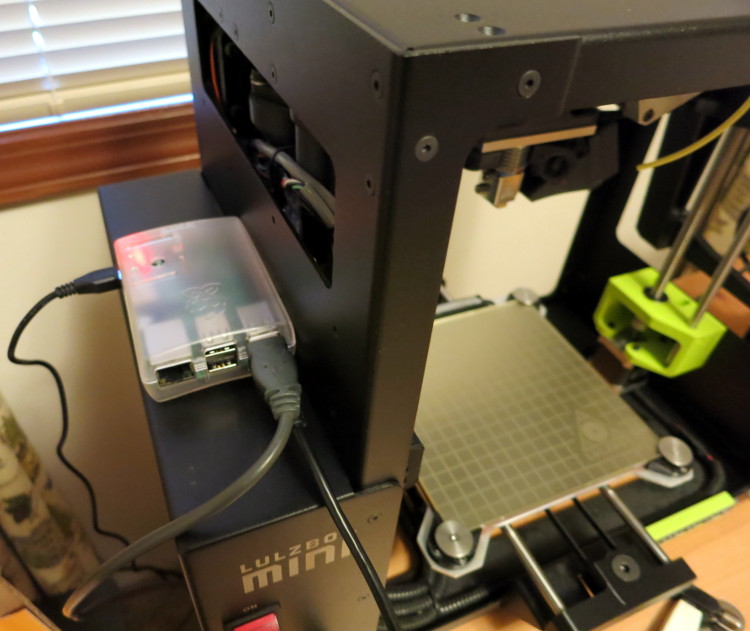
You can see in the picture above the Pi nicely fits on top of the Lulzbot Mini’s power supply, and plugs into the Mini via a 1 foot USB cable. There are even Pi cases on Thingiverse designed to fasten to the Mini’s frame. Now I can monitor print jobs from my laptop, but more importantly I don’t have to devote the space and money for a laptop just to run the Mini.
You might notice a second USB cable in the picture. While my Mini was out for repairs, I decided to buy and assemble a kit Prusa I3 MK3 3D printer, to learn how to maintain 3D printers. Assembling that kit – 24 hours over 4 days – gave me the confidence that I can now (in theory) maintain both my printers without resorting to sending them to the factory for repairs.