

One of the things holding me back from 3D printing for so long was learning what tools I needed and how to use them. It’s relatively easy to print things once you have a design: Cults3D, Hubs, and many others (including your friends who have printers) can print your designs, your local library may have printers for you to use, or you can buy a printer for a few hundred dollars.
As part of my Dog Bed Weight Scale project, I learned how to design and print stuff, using Open Source software. All you need to get started is a little software, a little expertise, and patience.
The general design/print path is:
- Design the part using a CAD (Computer Aided Design) program.
- Export the design to a .stl file, using your CAD program.
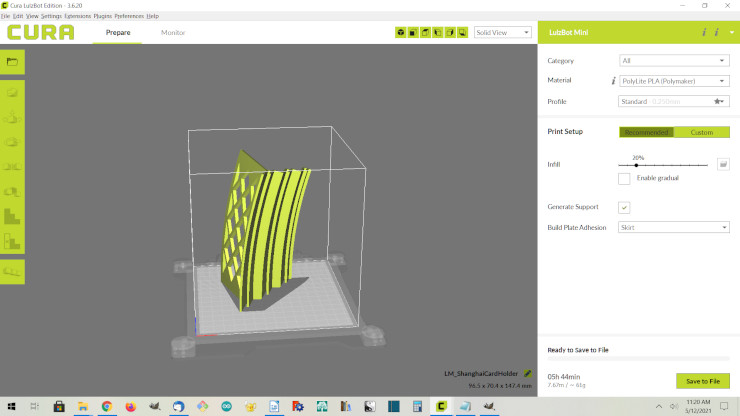
- Read the .stl file into a Slicer proram, and generate the corresponding .gcode file.
- Copy the .gcode file to a 3D printer.
- Tell the printer to print the file.
Design CAD Software
You have many choices. Here are just a few:
- FreeCAD. A free, Open Source, Parametric design CAD program. This is the program I use most often. Parametric models are easy to scale and modify. You define your model in terms of Constraints (for example, “this is a vertical line, and it’s 24mm tall”). You’ll like Parametric Design if you think about design in terms of Engineering Drawings, like I do.
- Autodesk Fusion 360. A proprietary, fully-featured, Parametric design CAD program. In my opinion Fusion 360 is aimed at professional designers rather than hobbyists.
- TinkerCAD. A simple CAD program designed for beginners.
- …and many, many more.
Slicer Software
Often the manufacturer of the 3D printer you’re using will recommend a particular slicer program that works well with that printer. Here are a few:
- Cura is a free, Open Source Slicer. You can get two different versions:
- If you have a Lulzbot printer, you can download the Cura Lulzbot Edition. That version is pre-configured to work great with Lulzbot’s printers.
- or you can get the latest version of Cura from Ultimaker’s Cura pages.
- PrusaSlicer is a free, Open Source Slicer optimized for Prusa printers.
- …and many, many more.
Ways of getting the .gcode file to your 3D printer
As with anything else, you have choices in this step:
- You can plug your 3D printer into your PC and use software that came with the printer to print your .gcode file.
- You can copy your .stl or .gcode file to an SD Card and plug the SD card into your printer.
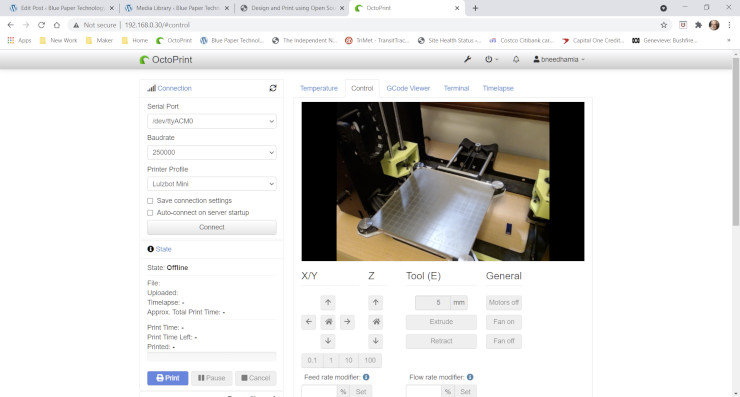
- You can use OctoPrint to manage the printing of your .gcode file. OctoPrint is a network-based, Open Source 3D printer controller. I use a version called OctoPi, which is installed on a Raspberry Pi, which is plugged into my printers. OctoPi lets me print and monitor prints over my home network, without tying up my PC.
Ways to tell the printer to print the .gcode file
What you do to print your file depends on how you transferred the file to the printer:
- If you plugged your PC into your printer, you use your printer’s software to print the file.
- If you copied your .stl or .gcode file to an SD card, you can use the physical screen on the printer to select and print that file.
- If you copied the .gcode file using OctoPrint, you can use your PC’s web browser to tell OctoPrint to print the file.
FreeCAD Tips
- The first time you use it, set Edit / Preferences… / General / Start up / Auto load module after startup to Part Design. That will save you a lot of “why can’t I…” headaches later, because I find I spend most of my time in the Part Design workbench.
- I found FreeCAD’s Basic Part Design Tutorial is very helpful for making that very first part. That page may be a little out of date (version 0.17 vs. 0.19), but the general approach is correct.
- In FreeCAD, you structure your model (your design) as a list of Transform and Sketch pairs. That is, you first draw a 2D Sketch (drawing), then extrude or rotate it into a 3D object.
- When you’re happy with a part, switch to the Part workbench (instead of the Part Design workbench), select all the pieces of the part, then choose Part / Create a copy / Create simple copy. That will produce a solid part that is capable of being printed or assembled with other parts. If you don’t do this step, your print may or may not work. I was unfortunately lucky in my first print, so I didn’t know about this Create Simple Copy, and my second design didn’t work at all (until I redesigned it).
- To start, select File / New (almost nothing on the screen will change), then click the Create a new sketch icon (it has a circle and a square). A dialog will ask what plane you want to work in. The XY plane (looking down on the part) is often a good place to start.
Filament Types
There are dozens of types of filament, that look amazing or do amazing things. For your first prints I’d recommend buying a reel of filament from your printer manufacturer, because that filament is likely known by your Slicer program and likely works well with your printer.
I like to start with PLA because it’s easy to work with and is – in theory – biodegradable. For more sturdy applications, I like PETG, although it can be a bit tricky to work with.
Some filaments require your printer to have special capabilities. For example some printers can’t print flexible filaments such as NinjaFlex, because the gap in the extruder doesn’t keep the flexible filament straight. Check with your printer manufacturer to find what types of filament it supports.
Some composite filaments, such as Steel-Filled Metal Composite PLA, benefit from a special, more sturdy nozzle to avoid wearing the nozzle too quickly. You can often buy a more sturdy nozzle from your printer manufacturer.
Filament Tips
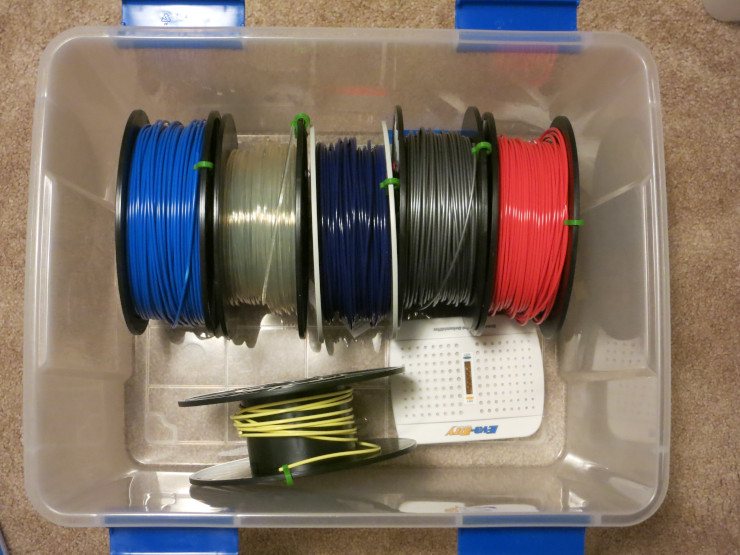
- Keep your filament in a drying box, such as I describe in The Best Way to Store 3D Printing Filament. Nylon filaments often require a special drying box that feeds directly to your printer, because Nylon quickly absorbs moisture from the air.
- PETG can stick so hard to your printer’s print bed that removing it breaks the bed. Windex Original works well for me as a print bed preparation. I describe how to use it in Printing Replacement Parts for Your Prusa 3D Printer.
- If your printer manufacturer offers one, buy a flexible bed, such as the Magnetic Flex Bed for the Lulzbot Mini. The Prusa i3 MK3 comes with a flexible bed. These beds make it easy to remove your finished prints from the bed.
- Before trying to remove your print, make sure the print bed is at the correct temperature for removal, as recommended by your printer manufacturer. For example, I’ve found PLA prints easy to remove from my Lulzbot Mini when the bed is at 45° C, but can be hard to remove when the bed has cooled down to room temperature.
Final Tips
- Follow all the safety information for your printer and filament. If you don’t you can seriously injure yourself or damage your printer.
- Have Fun! I get a huge kick out of designing and printing my own functional prints for custom cases and clips, and entertaining prints such as my Classical Labyrinth rolling BB toy.
